IO Board
Current Board Revision
Revision 6.0
The MiSTer IO Board is an optional expansion.
Anatomy
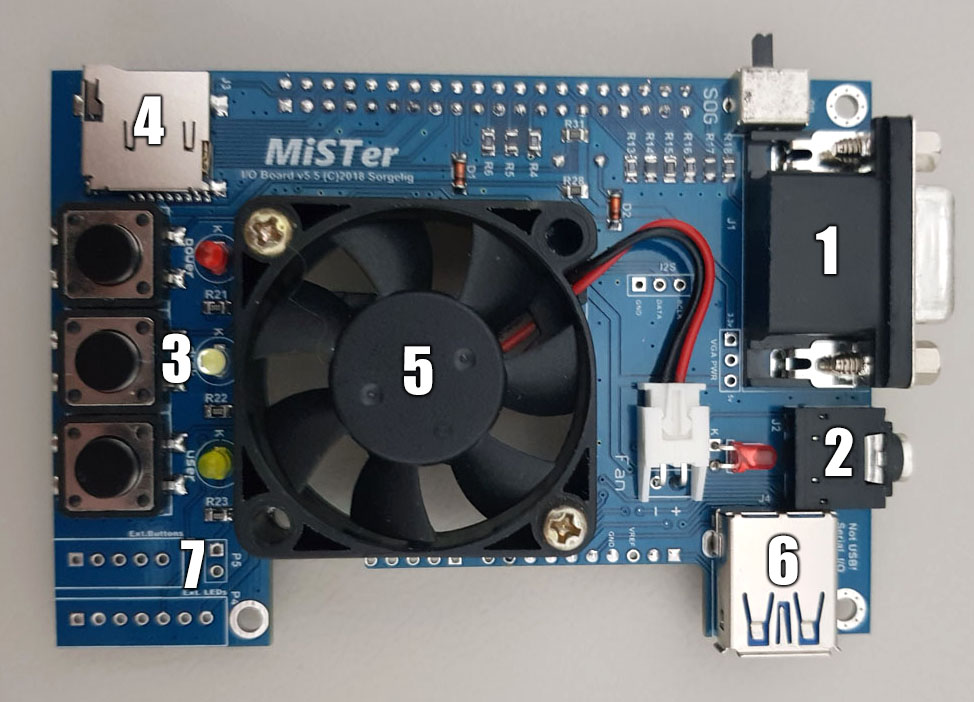
The following features will be added to your MiSTer
- [1] - VGA Connector1
- [2] - 3.5mm Audio Jack with TOSLink
- [3] - 3 Buttons and 3 Status LEDs
- [4] - Secondary SD card (for some cores)
- [5] - FAN for cooling the FPGA
- [6] - Expansion connector (in the form of USB 3.0 connector, but it’s not USB!)
- [7] - Additional connectors to integrate the MiSTer into cases
Secondary SD card
Some cores require low-level SD card access. The primary SD card cannot provide low-level access due to an incompatible layout. It is also locked by Linux system from direct access. Thus, I/O board v5.x provides the secondary SD card which is directly connected to FPGA. Linux system doesn’t see this card. The layout of the secondary SD card fully depends on core requirements. Usually, it’s simple FAT16 format, but some cores may require custom formatting.
Schematics
Secondary SD card is a simple direct connection between SD connector and DE10-nano GPIOs. It’s possible to solder by yourself if whole I/O Board is not required (or older I/O Board is used). Check the schematic if you want to connect it by yourself.
Cores with Secondary SD card support
Following cores support (but not require, see VHD section) the secondary SD card:
- BBC Micro
- MSX
- Sinclair QL - SD support hasn’t been confirmed yet - requires specific ROM. Current ROM doesn’t use SD card.
- TSConf
Following cores require the secondary SD card:
- Sharp X68000
Use VHD files instead of secondary SD card
The cores where secondary SD card is optional require VHD image file to replace the SD card in order to work. VHD image is a simple dump of SD card. You can prepare a special SD card for specific core and then make a full backup using a utility such as Win32 Disk Imager. You even can create VHD file without SD card at all. In this case, you can create a smaller VHD file with suitable size in such application as WinImage - save it into IMA format and then rename to VHD.
Notes about VHD format
- Usually FAT16 is required, but some cores can support FAT32 as well.
- Content of VHD file should be exactly as it is originally required for Secondary SD card.
- Most (but not all) cores support both non-MBR and MBR types of images. MSX core is known to support only MBR images. Tools like WinImage create only non-MBR images but may open and edit MBR images created somewhere else (like in disk dumper tool from a real prepared SD card).
How to use VHD files
You can make the image which will be mounted automatically at the start of the core. So, it will look like you have SD card connected at the start. For automatic mounting, you need to name the VHD as CoreID.VHD and place together with RBF file or create the folder *CoreID *and put BOOT.VHD image in that folder. The second option is convenient if you have several VHD files for the core, while the first option is more convenient if only a single file is used.
CoreID is the name you see in core’s OSD.
For example, for Atari 800 core, the auto mounted name will be Atari800.vhd
How to use Secondary SD card and VHD
VHD file has priority over a real secondary SD card if mounted. Unmount the VHD (press BACKSPACE while choosing VHD file in OSD) in order to use the Secondary SD card.
Serial IO
The User Port is the port on the IO Board that has the same physical appearance as a USB 3.0 port, but it is merely using a USB 3.0 connector as a means for serial I/O communication.
The port could potentially have various uses, but these are features that are currently implemented or upcoming.
SNAC (Serial Native Accessory Converter)
This essentially means that a system’s original controller can be connected (on supported cores) to be used as if they were connected to the original system. This means there is absolutely no lag unless it’s native to the original system. Additionally, any original accessories should be compatible within reason (this won’t make your original lightguns magically work on a LCD). Currently only one controller port is supported, but (depending on the core) can be swapped between the 1st and 2nd controller port in the core’s OSD.
An adapter will be required that is mostly wire-to-wire plus level shifters to translate the DE-10 Nano’s 3.3V IO pins to 5V used in older system’s controllers.
Cores with support:
- NES
- SNES (coming soon)
BlisSTer (available at selected stores)
This is a combination of a USB hub board that also has a low latency controller interface via the Low-Latency API (LLAPI) that was design to work with the LLAPI (Low level API) in the Bliss-Box adapters. With Bliss-Box style adapters this will allow you connect original controllers for various systems with extremely low latency. The upside of this is that you could technically use any compatible controller with any supported core, so you could use a Genesis controller on the NES core if you really wanted to. The downsize vs SNAC is that this will mostly/only work with controllers, so multi-taps and oddball accessories will generally not be compatible.